Easy Sourdough Bread for Beginners – A Foolproof Homemade Recipe
There’s something deeply comforting about baking your own bread — the warm aroma, the golden crust, the first crackle as it cools. And while sourdough has a reputation for being tricky, this easy sourdough bread for beginners proves that anyone can do it — no special equipment, no years of practice, just a little patience and care.

Sourdough isn’t just bread; it’s a living tradition that connects generations of bakers. The beauty lies in its simplicity — flour, water, salt, and time. That’s all it takes to transform humble ingredients into a crusty, tangy, beautifully airy loaf.
This beginner-friendly sourdough recipe walks you through each step, explaining not just the how but the why — so you can confidently bake your first artisan-style loaf right in your own kitchen.
Why You’ll Love This Recipe
- Perfect for Beginners: Minimal ingredients, clear steps, and flexible timing make this the easiest entry point to sourdough baking.
- No Fancy Equipment Needed: You can use a Dutch oven, cast iron pot, or even a baking sheet.
- Incredibly Flavorful: The long fermentation gives this bread its signature tang and complex aroma.
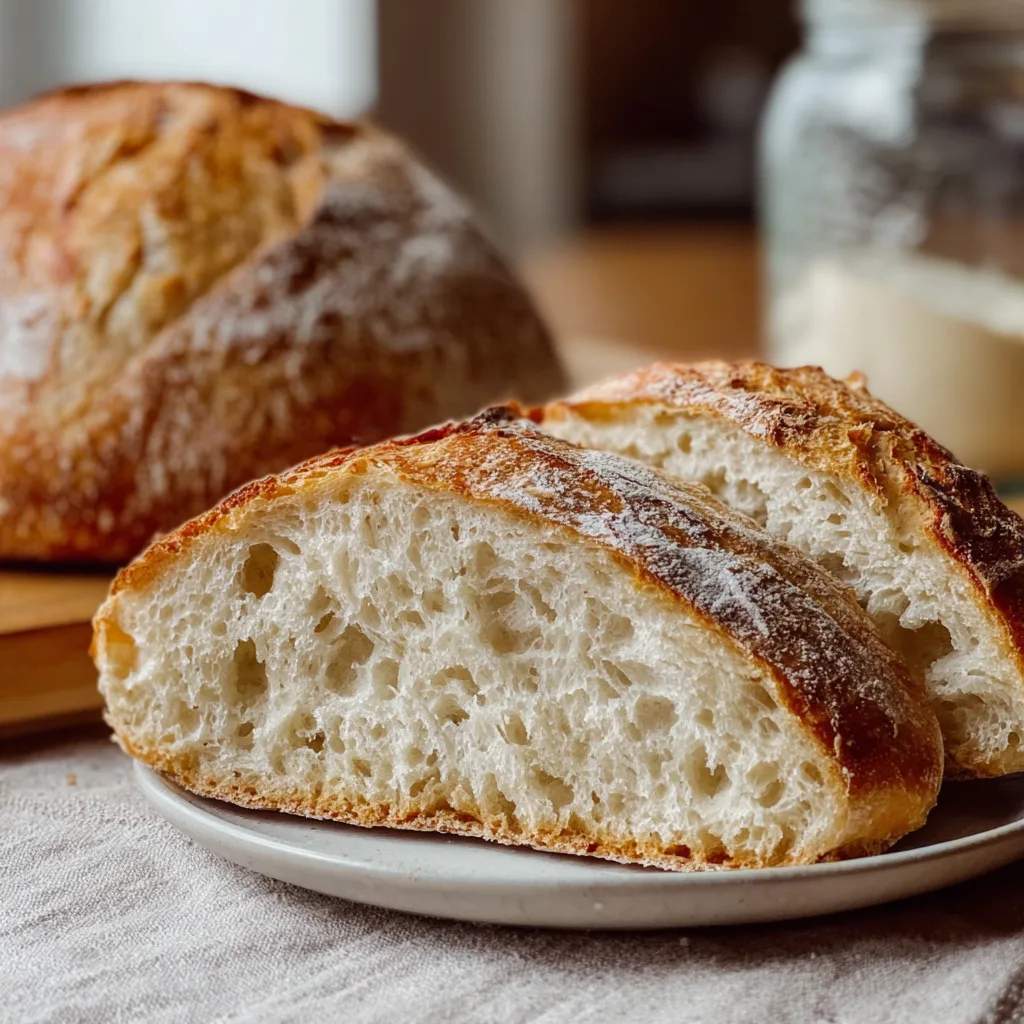
- Crisp Crust + Soft Interior: The contrast between crunchy crust and chewy, open crumb is pure satisfaction.
- Naturally Leavened: No commercial yeast — your active sourdough starter does all the work!
What You’ll Need
Before we start mixing, let’s talk about your essential ingredients and tools.
Key Ingredients
- Active sourdough starter: This is your natural yeast culture, full of wild yeast and bacteria that make sourdough rise. It should be bubbly and doubled in size after feeding.
- All-purpose flour or bread flour: Bread flour gives more structure, but all-purpose flour works fine for beginners.
- Water: Filtered or dechlorinated water helps your starter thrive.
- Salt: Enhances flavor and strengthens the dough structure.

Recommended Tools
- Mixing bowl
- Kitchen scale (for best accuracy)
- Dough scraper or spoon
- Proofing basket or bowl lined with a towel
- Dutch oven or heavy pot with a lid
- Parchment paper
Ingredients
- 100g active sourdough starter (fed 4–6 hours before use)
- 375g warm water (around 80°F / 27°C)
- 500g bread flour (or all-purpose)
- 10g salt
Instructions
1. Feed Your Starter
Start by feeding your sourdough starter several hours before baking. It should be bubbly, airy, and doubled in size when ready. If you drop a small spoonful in water and it floats, it’s perfect!
2. Mix the Dough
In a large bowl, mix 100g active starter with 375g warm water until mostly dissolved. Add 500g flour and stir with a spoon or your hands until no dry bits remain. The dough will look shaggy and sticky — that’s okay!
Cover the bowl with a damp towel and let it rest for 30–45 minutes. This rest is called autolyse, and it helps the flour absorb water and begin gluten development naturally.
3. Add Salt
After resting, sprinkle 10g salt over the dough. Wet your hands and gently fold the dough over itself several times to incorporate the salt. You’ll notice it tightening slightly as you fold.
4. Bulk Fermentation (First Rise)
Cover the bowl and let it rest at room temperature (about 70–75°F) for 4–6 hours. Every 30–45 minutes for the first 2 hours, perform a set of stretch and folds:
- Grab one side of the dough, stretch it up, and fold it over.
- Rotate the bowl and repeat 3–4 times.
This technique strengthens the dough and helps build structure without kneading.
After 4–6 hours, the dough should look puffy and slightly domed, with bubbles forming on the surface.
5. Shape the Dough
Lightly flour your surface and gently tip out the dough. Avoid punching it down — you want to keep those air bubbles intact!
Fold the edges of the dough into the center to form a round shape, then flip it seam-side down. Using your hands, gently tighten the dough by rotating it on the counter to create surface tension.
6. Second Rise (Proofing)
Line a bowl or proofing basket with a clean towel and dust it with flour. Place the dough seam-side up. Cover and let rise for 2–3 hours at room temperature, or refrigerate overnight (8–12 hours) for deeper flavor and easier scoring.
7. Preheat the Oven
When ready to bake, place your Dutch oven (with the lid) inside the oven and preheat to 450°F (230°C) for at least 30 minutes.
8. Score and Bake
Turn your dough onto a piece of parchment paper, seam-side down. Dust lightly with flour. Using a sharp knife or bread lame, score the top with a slash — this allows steam to escape and helps the bread expand.
Carefully place the dough (on parchment) into the hot Dutch oven, cover, and bake for 20 minutes.
After 20 minutes, remove the lid and bake for another 25–30 minutes, until the crust is deeply golden and crisp.
9. Cool Before Slicing
Remove from the pot and let cool on a wire rack for at least 1 hour before slicing. This allows the crumb to set and flavor to develop fully.
Easy Sourdough Bread for Beginners
Ingredients
Equipment
Method
- Feed starter 4–6 hours before baking until bubbly and doubled in size.
- Mix starter, water, and flour until shaggy, then rest 30–45 minutes (autolyse).
- Add salt and fold dough to incorporate.
- Let dough rise for 4–6 hours, performing stretch and folds every 30–45 minutes for the first 2 hours.
- Shape dough into a round and place in a floured bowl seam-side up.
- Cover and proof 2–3 hours or refrigerate overnight.
- Preheat Dutch oven to 450°F (230°C). Score dough and bake covered 20 minutes, then uncovered 25–30 minutes.
- Cool completely before slicing.
Notes
Tips for Success
- Use a Kitchen Scale: Measuring by weight gives consistent results — flour can compact differently when measured in cups.
- Adjust for Temperature: If your kitchen is cool, fermentation will take longer. Warm environments speed it up.
- Don’t Rush the Process: The beauty of sourdough is in slow fermentation. Patience gives you that perfect crust and tang.
- Practice Makes Perfect: Your first loaf might not look like a bakery loaf — and that’s okay! Every attempt builds skill.
Sourdough Starter Care Tips
Your starter is alive — think of it as a pet! Feed it regularly, keep it in a warm spot, and don’t panic if it separates or smells tangy.
For daily bakers, keep it at room temperature and feed it once or twice a day. For occasional bakers, store it in the fridge and feed it once a week.
Fun Variations
- Whole Wheat Sourdough: Replace up to 30% of flour with whole wheat for a hearty, nutty flavor.
- Herb & Olive Loaf: Add 1 tbsp olive oil, 1 tsp rosemary, and chopped olives to the dough.
- Cinnamon Raisin Sourdough: Mix in 1 tsp cinnamon and ½ cup raisins after bulk fermentation for a sweet twist.
- Garlic Parmesan Sourdough: Fold in roasted garlic cloves and grated cheese before shaping.
How to Store and Serve
- Room Temperature: Store in a paper bag or wrapped in a towel for up to 2 days.
- Freezer: Slice, wrap, and freeze for up to 3 months. Toast slices directly from frozen.
- Reheating: Warm in a 350°F oven for 10 minutes to refresh the crust.
Serve sourdough with butter and honey, alongside soups, or topped with avocado for a perfect breakfast toast.
Why Sourdough Is Worth the Effort
Sourdough isn’t just about taste — it’s about tradition, patience, and connection. The natural fermentation process makes bread easier to digest and enhances its nutrients. Plus, it’s incredibly rewarding to know your hands (and your starter) created that beautiful loaf from scratch.
Each bake tells a story, and this beginner sourdough recipe is your first chapter in the timeless art of breadmaking.