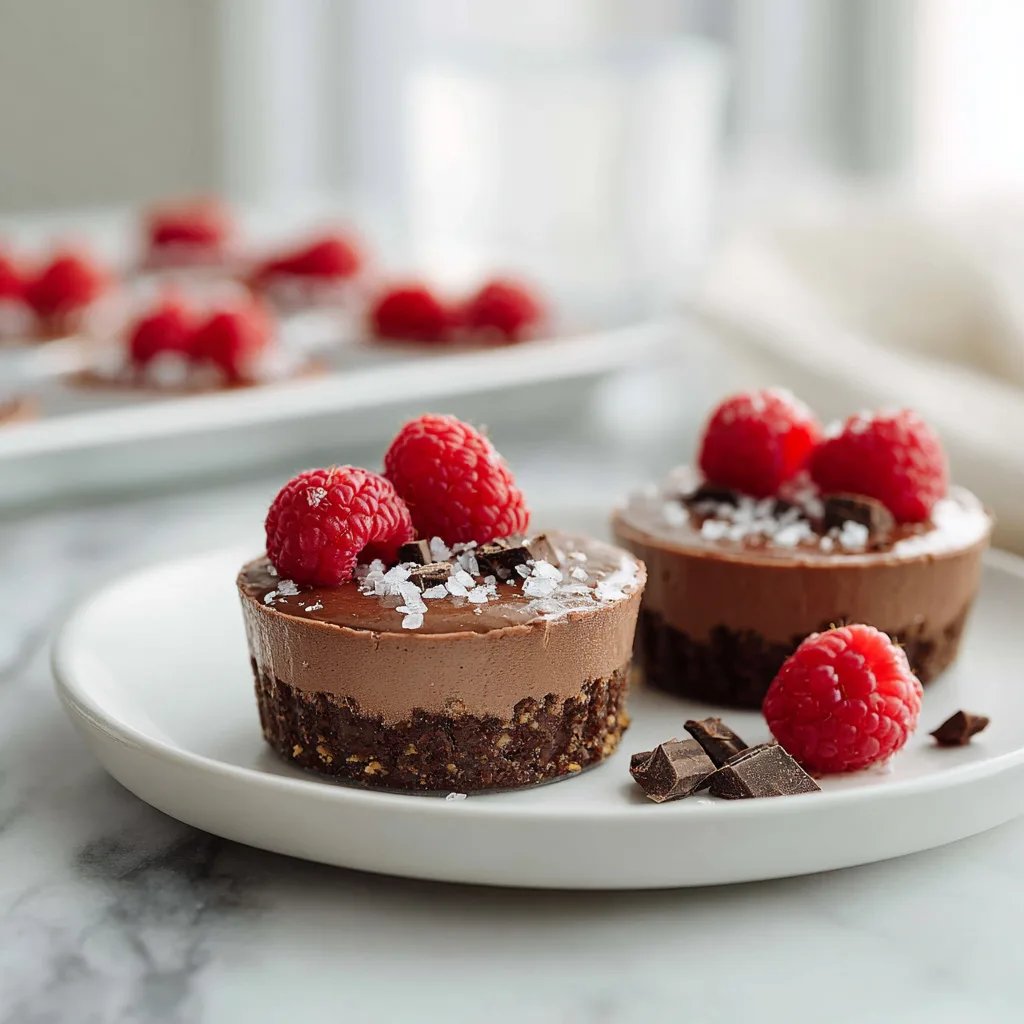
Easy Chocolate Raspberry Mousse Cups with Sea Salt – Luxurious, No-Bake, And Impossible to Resist
If you’ve been searching for a dessert that’s easy, elegant, and absolutely irresistible, Easy Chocolate Raspberry Mousse Cups with Sea Salt are about to become your newest obsession. This recipe blends the silky richness of dark chocolate, the natural sweetness of fresh raspberries, and just a whisper of flaky sea salt to create a balanced, restaurant-worthy treat—without ever turning on your oven.
Perfect for date nights, dinner parties, holidays, or “I just want something decadent tonight,” these mousse cups take only minutes to prepare but look like they took hours. Whether you’re a seasoned baker or someone who rarely ventures beyond boxed brownies, you’ll find this recipe wonderfully doable.

In today’s digital world, simple yet luxurious desserts are trending more than ever—and this mousse checks every box. It’s no-bake, make-ahead-friendly, naturally gluten-free, and beautifully photogenic. That means you can serve it with confidence at any gathering or stash a few cups in the fridge for the perfect late-night indulgence.
Let’s dive deep into what makes this recipe so special, how to perfect it, and how to customize it for any flavor mood.
Why You’ll Love These Mousse Cups
Every element of this dessert is designed for maximum flavor with minimal effort.
1. Silky, Rich Chocolate Mousse
The base combines melted dark chocolate with gently whipped cream to create a smooth, airy texture. Unlike egg-based mousse, this version is incredibly easy and beginner-friendly.
2. Fresh Raspberry Layer
Raspberries add natural acidity and brightness, cutting through the richness of the chocolate. When layered in the cups, they provide a gorgeous color contrast.
3. A Touch of Flaky Sea Salt
If you’ve never paired chocolate with sea salt, prepare to fall in love. Even a small pinch brings out deeper cocoa notes and elevates the entire dessert.
4. No-Bake Simplicity
This dessert is ready in minutes and chills to perfection. No stovetop cream tempering, no gelatin, no complicated steps—just melt, whip, layer, serve.
5. Perfect for All Skill Levels
Even beginner home cooks can produce a stunning, show-stopping dessert.
Ingredients
Use dashes “–” per user preference.
For the Chocolate Mousse
- – 1 ½ cups heavy whipping cream
- – 1 cup dark chocolate, chopped
- – 2 tbsp cocoa powder
- – 3 tbsp granulated sugar
- – 1 tsp vanilla extract
For the Raspberry Layer
- – 1 ½ cups fresh raspberries
- – 1 tbsp sugar (optional)
- – 1 tsp lemon juice
For Topping
- – Fresh raspberries
- – Shaved dark chocolate
- – A pinch of flaky sea salt
- – Optional: whipped cream or micro mint

Instructions
1. Prepare the Raspberry Layer
Mash the raspberries lightly with sugar and lemon juice until juicy but still textured. Set aside to allow the natural juices to release.
2. Melt the Chocolate
Place chopped dark chocolate in a microwave-safe bowl. Heat in 20-second intervals, stirring between rounds, until smooth and glossy. Allow to cool slightly.
3. Whip the Cream
In a chilled bowl, whip the heavy cream, sugar, vanilla, and cocoa powder until soft peaks form. Avoid overbeating.
4. Fold in the Chocolate
Slowly fold the melted chocolate into the whipped cream using a spatula. Fold gently to preserve the mousse’s airy texture.
5. Assemble the Cups
Add a spoonful of raspberry mixture to the bottom of each glass or dessert cup.
Top with a generous layer of chocolate mousse.
Repeat layers if desired.
6. Chill
Refrigerate for at least 1 hour to allow the mousse to set and flavors to merge.
7. Garnish & Serve
Top with fresh raspberries, chocolate shavings, and a tiny pinch of flaky sea salt. Serve chilled.
Tips for Perfect Chocolate Mousse Every Time
Use Good Chocolate
Because chocolate is the star of this recipe, choose high-quality dark chocolate (60–70% cocoa). The better the chocolate, the richer and smoother the mousse.
Avoid Overwhipping
Whip the cream just to soft peaks. Overwhipping leads to a grainy, lumpy texture once the chocolate is folded in.
Let the Chocolate Cool Slightly
Hot chocolate can melt the whipped cream, destroying the mousse texture. Aim for barely warm.
Chill Your Bowls and Tools
Cold equipment makes for a lighter, more stable whipped cream.
Make Ahead
These mousse cups can be chilled up to 24 hours in advance, making them a brilliant stress-free entertainment dessert.
Variations to Customize Your Mousse
1. White Chocolate Raspberry Mousse Cups
Swap dark chocolate for white chocolate for a sweeter, creamier version.
2. Mocha Mousse Cups
Add 1 tbsp instant espresso powder to the whipping cream before beating.
3. Hazelnut Chocolate Mousse
Fold 2 tbsp of Nutella into the melted chocolate before adding the whipped cream.
4. Spiced Winter Mousse
Add a pinch of cinnamon and cardamom for a cozy flavor twist.
5. Keto-Friendly Version
Use sugar-free dark chocolate and powdered monk fruit sweetener.
Serving Suggestions
- Serve in mini dessert glasses for parties.
- Add a brownie or cookie crumble at the bottom for extra texture.
- Garnish with edible flowers for a high-end restaurant presentation.
- Pair with champagne or a fruity mocktail for special occasions.
Fun Facts About Chocolate Mousse
- Chocolate mousse originates from France and translates literally to “chocolate foam.”
- Before the 1900s, mousse was primarily a savory dish!
- Adding sea salt is a modern twist that intensifies the depth and complexity of cocoa flavors.
Why This Recipe Works for Every Occasion
This recipe strikes the perfect balance between simplicity and sophistication. It’s rich enough for celebrations yet easy enough for a random Tuesday night dessert craving. Plus, the flavor combination—dark chocolate, fresh berries, and sea salt—is universally adored.
Whether you’re preparing a romantic dessert, a Mother’s Day treat, or something to impress dinner guests, Easy Chocolate Raspberry Mousse Cups with Sea Salt deliver elegance with zero stress.
Easy Chocolate Raspberry Mousse Cups with Sea Salt
Ingredients
Equipment
Method
- Preheat oven to 350°F (175°C). Line baking sheets with parchment paper.
- In a medium bowl, whisk together flour, baking powder, baking soda, salt, cinnamon, nutmeg, and cloves.
- In another bowl, cream butter and brown sugar until light and fluffy. Add egg and vanilla extract, mixing well.
- Gradually mix in dry ingredients, alternating with apple cider, until a soft batter forms.
- Drop batter onto baking sheets using a scoop, spacing 2 inches apart. Flatten slightly.
- Bake 12–15 minutes until set and lightly golden. Cool completely on wire racks.
- Beat softened butter with powdered sugar and vanilla. Add cream to reach desired filling consistency.
- Sandwich cookies with filling, serve immediately or store in airtight container.