DIY Stained Glass Lollipops: Colorful Edible Candy Art You Can Make at Home
Few homemade treats are as visually magical as DIY Stained Glass Lollipops. These vibrant candies look like miniature works of art, with translucent jewel-toned centers that resemble real stained glass. Not only are they stunning to look at, but they’re also incredibly fun to make.
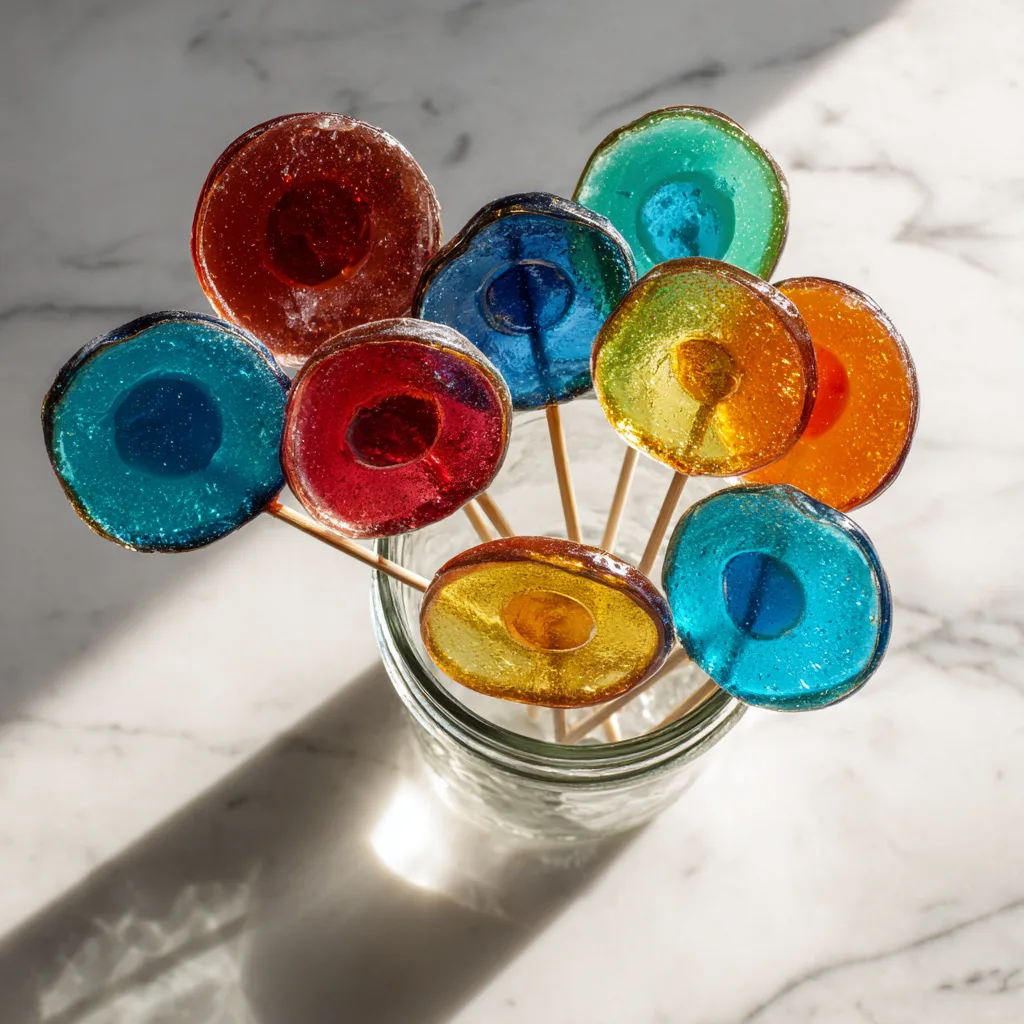
If you’ve ever admired the colorful glow of stained glass windows in sunlight, this recipe captures that same beauty in edible form. By melting crushed hard candies inside cookie cutter shapes, you create glossy, transparent lollipops that sparkle in shades of ruby red, emerald green, golden amber, and sapphire blue.
The best part? This recipe is surprisingly simple. You don’t need complicated candy thermometers or advanced confectionery skills. With just a handful of ingredients and some creativity, you can make dazzling homemade lollipops perfect for parties, gifts, holidays, or simply a fun kitchen project with kids.
In this complete guide, you’ll learn everything about making stained glass lollipops—from choosing the right candies to shaping and decorating your edible masterpieces.
Why You’ll Love DIY Stained Glass Lollipops
These lollipops are more than just candy—they’re edible art. Here’s why people adore this recipe:
Visually stunning
The transparent colors mimic real stained glass and glow beautifully in natural light.
Easy ingredients
You only need hard candy and a few simple tools.
Customizable shapes
Use cookie cutters to make hearts, stars, flowers, or seasonal shapes.
Perfect for gifts
Wrap them in clear cellophane for beautiful homemade presents.
Fun for all ages
Kids and adults both love making and decorating these treats.
The Magic Behind Stained Glass Candy
What makes these lollipops so special is the way hard candy melts and fuses together in the oven.
Hard candies are primarily made of sugar and flavorings. When heated, they melt smoothly and become liquid. As they cool again, they solidify into a glossy, glass-like surface.
By crushing and mixing candies of different colors, you create stunning marbled patterns that resemble stained glass windows. When light shines through them, the effect is mesmerizing.
Ingredients
- 2–3 cups assorted hard candies (Jolly Ranchers or similar)
- 12–15 lollipop sticks
- Parchment paper or silicone baking mat
- Nonstick cooking spray (optional)
- Cookie cutters (metal shapes work best)

Instructions
1. Preheat the Oven
Preheat your oven to 300°F (150°C). Line a baking sheet with parchment paper or a silicone baking mat.
Place metal cookie cutters on the lined baking sheet, leaving space between them.
2. Prepare the Hard Candy
Separate your hard candies by color if desired. Place them in zip-top bags and crush them using a rolling pin or meat mallet until you have small pieces.
Avoid crushing them into powder—small chunks create the best stained glass effect.
3. Fill the Cookie Cutters
Spray the inside of cookie cutters lightly with nonstick spray if desired.
Fill each cutter with crushed candy pieces, about halfway to three-quarters full.
You can mix different colors together for a marbled glass effect.
4. Bake the Candy
Place the baking sheet in the oven and bake for 6–10 minutes.
Watch carefully—the candy should melt completely and spread evenly inside the cookie cutter without bubbling excessively.
5. Insert Lollipop Sticks
Remove the tray from the oven and immediately place a lollipop stick into the melted candy near the edge of each shape.
Press gently so the stick is embedded but not touching the bottom.
6. Cool Completely
Allow the candy to cool completely on the baking sheet for 20–30 minutes.
Do not attempt to move them while hot—they are extremely fragile.
7. Remove and Enjoy
Once fully hardened, gently pop the candy out of the cookie cutters.
Your stained glass lollipops are ready to enjoy!
Tips for Perfect Stained Glass Lollipops
Use High-Quality Hard Candy
Clear, brightly colored candies produce the best glass-like effect.
Avoid Overbaking
If baked too long, the candy may bubble and lose clarity.
Crush Evenly
Uneven candy pieces melt at different speeds. Aim for similar-sized chunks.
Use Metal Cookie Cutters
Plastic cutters may melt in the oven. Metal cutters hold their shape perfectly.
Let Them Cool Completely
Removing them too early can cause cracking.
Creative Flavor Combinations
One of the most fun parts of this recipe is experimenting with colors and flavors.
Try these combinations:
Cherry + Watermelon + Strawberry
Creates a warm red mosaic effect.
Green Apple + Lime
Bright emerald tones with tangy flavor.
Blue Raspberry + Grape
Deep jewel-toned purples and blues.
Lemon + Pineapple
Golden stained-glass sunshine colors.
Fun Shapes to Try
Cookie cutters allow endless creativity. Here are some ideas:
- Hearts for Valentine’s Day
- Stars for celebrations
- Snowflakes for winter
- Pumpkins for Halloween
- Trees for Christmas
- Flowers for spring parties
Seasonal shapes make these candies perfect for holiday gifts.
Decorating Ideas
While these lollipops are gorgeous on their own, you can make them even more special.
Sprinkle Edges with Sugar
Add sparkling sugar crystals for extra shimmer.
Drizzle White Chocolate
A light drizzle creates beautiful contrast.
Add Edible Glitter
Food-safe glitter enhances the stained glass effect.
Tie with Ribbon
Wrap finished lollipops in clear bags and add colorful ribbon.
Serving Suggestions
DIY stained glass lollipops are perfect for many occasions.
Party favors
Guests will love taking home these edible art pieces.
Cake toppers
Place them into cakes for colorful decoration.
Drink stirrers
Use them to sweeten tea or lemonade.
Holiday decorations
Hang them from dessert tables or treat stands.
Storage Tips
Homemade hard candy can last surprisingly long if stored properly.
- Keep in an airtight container
- Store in a cool, dry place
- Avoid humidity to prevent stickiness
- Separate layers with parchment paper
Properly stored lollipops can last 2–3 weeks.
Fun Kitchen Science
These candies demonstrate a fascinating food science process.
When sugar is heated, it transitions from a crystalline structure to a molten liquid. As it cools, the sugar molecules solidify into a transparent sheet, which is why the candy becomes clear and glass-like.
This transformation is the same principle used in professional candy making.
Kid-Friendly Kitchen Project
DIY stained glass lollipops are perfect for making with kids.
Children can:
- Choose candy colors
- Fill cookie cutters
- Create fun designs
- Decorate finished lollipops
Just be sure an adult handles the hot baking tray.
Holiday Variations
Christmas Stained Glass
Use red and green candies in tree-shaped cutters.
Halloween Candy Glass
Orange and purple candies in pumpkin shapes.
Valentine’s Day
Pink and red hearts with strawberry flavors.
Easter Candy Pops
Pastel-colored candies in egg or bunny shapes.

Troubleshooting
Candy bubbles too much
Lower oven temperature slightly.
Candy sticks to cutters
Use a light spray of nonstick cooking spray.
Lollipop stick moves
Insert it while the candy is still warm but slightly thickened.
Why Homemade Candy Is Special
Making candy from scratch brings a sense of creativity and nostalgia. The process is simple but magical—watching colorful candy melt into glossy glass shapes feels like a small kitchen miracle.
These stained glass lollipops are not just treats; they’re edible decorations that brighten any dessert table.
Whether you’re making them for a birthday party, holiday celebration, or just a fun weekend activity, these vibrant candies will always impress.
Once you try this recipe, you’ll discover how easy it is to transform ordinary hard candy into stunning homemade sweets.
DIY Stained Glass Lollipops
Ingredients
Equipment
Method
- Preheat oven to 300°F (150°C) and line a baking sheet with parchment paper.
- Place metal cookie cutters on the baking sheet and lightly spray with nonstick spray if desired.
- Crush hard candies into small pieces using a rolling pin.
- Fill each cookie cutter halfway with crushed candy pieces.
- Bake for 6–10 minutes until candy melts completely.
- Insert lollipop sticks into melted candy and allow to cool completely.
- Remove hardened lollipops from cookie cutters and serve or wrap for gifts.