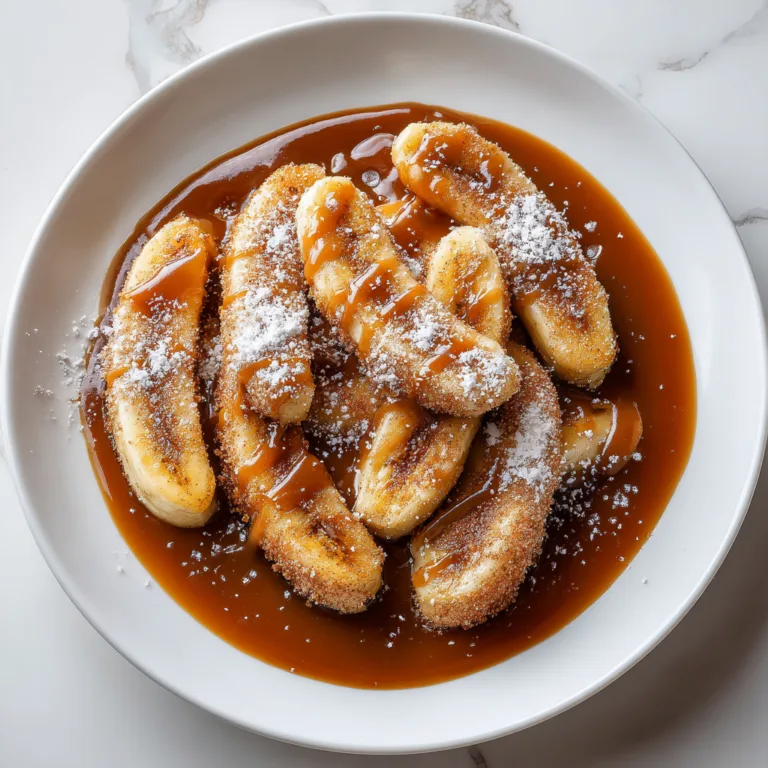
Sheet Pan Caramel Apples
A Timeless Treat Made Easy
Caramel apples have a nostalgic charm — crisp fruit coated in buttery caramel, sometimes finished with a sprinkle of nuts or colorful candy bits. They’re a fall classic, but who says you need a fairground to enjoy them?
With this Sheet Pan Caramel Apples recipe, you can make a dozen beautiful caramel apples right at home using a simple sheet pan. No fancy molds, no sticky countertop disasters — just perfectly coated apples ready to delight both kids and adults.
The secret to success? Using crisp, fresh apples, high-quality caramel, and letting them set on a parchment-lined sheet pan. From Halloween parties to autumn gatherings, these apples are the perfect combination of fun and flavor.

Ingredients
- 12 medium apples (Granny Smith, Honeycrisp, or Fuji)
- 12 wooden sticks or popsicle sticks
- 14 oz (400 g) soft caramel candies or caramel squares
- 2 tablespoons heavy cream
- 1/2 cup chopped nuts, sprinkles, or chocolate drizzle (optional)
- Parchment paper (for lining sheet pan)

Instructions
- Prepare apples: Wash and dry apples thoroughly. Remove stems and insert wooden sticks firmly into each apple.
- Line sheet pan: Place a sheet of parchment paper on a baking sheet and lightly grease it.
- Melt caramel: In a medium saucepan over low heat, melt caramel candies with heavy cream, stirring constantly until smooth and glossy.
- Dip apples: Holding the stick, dip each apple into the caramel, swirling to coat evenly. Let excess drip off.
- Add toppings: Immediately sprinkle with chopped nuts, sprinkles, or drizzle with melted chocolate if desired.
- Set apples: Place each apple on the prepared sheet pan. Let them cool at room temperature for 20–30 minutes, or refrigerate for 10–15 minutes for faster setting.
- Serve & enjoy: Once caramel has set, your apples are ready to enjoy. Keep leftovers refrigerated for up to 3 days.

Sheet Pan Caramel Apples
Ingredients
Equipment
Method
- Wash and dry apples. Insert wooden sticks.
- Line a sheet pan with parchment paper and lightly grease.
- Melt caramel candies with heavy cream over low heat until smooth.
- Dip each apple into caramel, swirling to coat evenly.
- Immediately sprinkle toppings if desired.
- Place apples on prepared sheet pan and let caramel set.
- Serve or refrigerate for up to 3 days.
Notes
Why You’ll Love This Recipe
- Easy and mess-free: Sheet pan method avoids sticky countertops.
- Customizable: Add toppings, drizzle chocolate, or mix caramel flavors.
- Perfect for parties: Makes a beautiful, colorful display for gatherings.
- Kid-friendly activity: Great to make with children.
Variations & Twists
- Chocolate-Caramel Apples: Dip in dark chocolate before adding caramel.
- Sea Salt Caramel Apples: Sprinkle coarse sea salt over caramel before it sets.
- Nutty Apples: Use crushed pecans, almonds, or peanuts for texture.
- Holiday Edition: Use colored sprinkles or edible glitter for festive flair.
Serving Suggestions
- Place on decorative plates for a party centerpiece.
- Serve with hot apple cider or a spiced latte.
- Individually wrap in clear cellophane for gifts or party favors.
Storage & Tips
- Room temperature: Store in a cool, dry place for up to 2 days.
- Refrigeration: Store in fridge for up to 3 days. Bring to room temperature before serving.
- Avoid sticky mishaps: Make sure apples are completely dry before dipping.
FAQ
Q: Can I use caramel sauce instead of candies?
Yes, but it should be thickened slightly to coat apples properly.
Q: Can I make these vegan?
Use dairy-free caramel candies and plant-based cream alternatives.
Q: Do I need parchment paper?
It’s highly recommended to prevent sticking and make cleanup easy.