Loaded Brownie Cheesecake Cups – The Ultimate Decadent Dessert
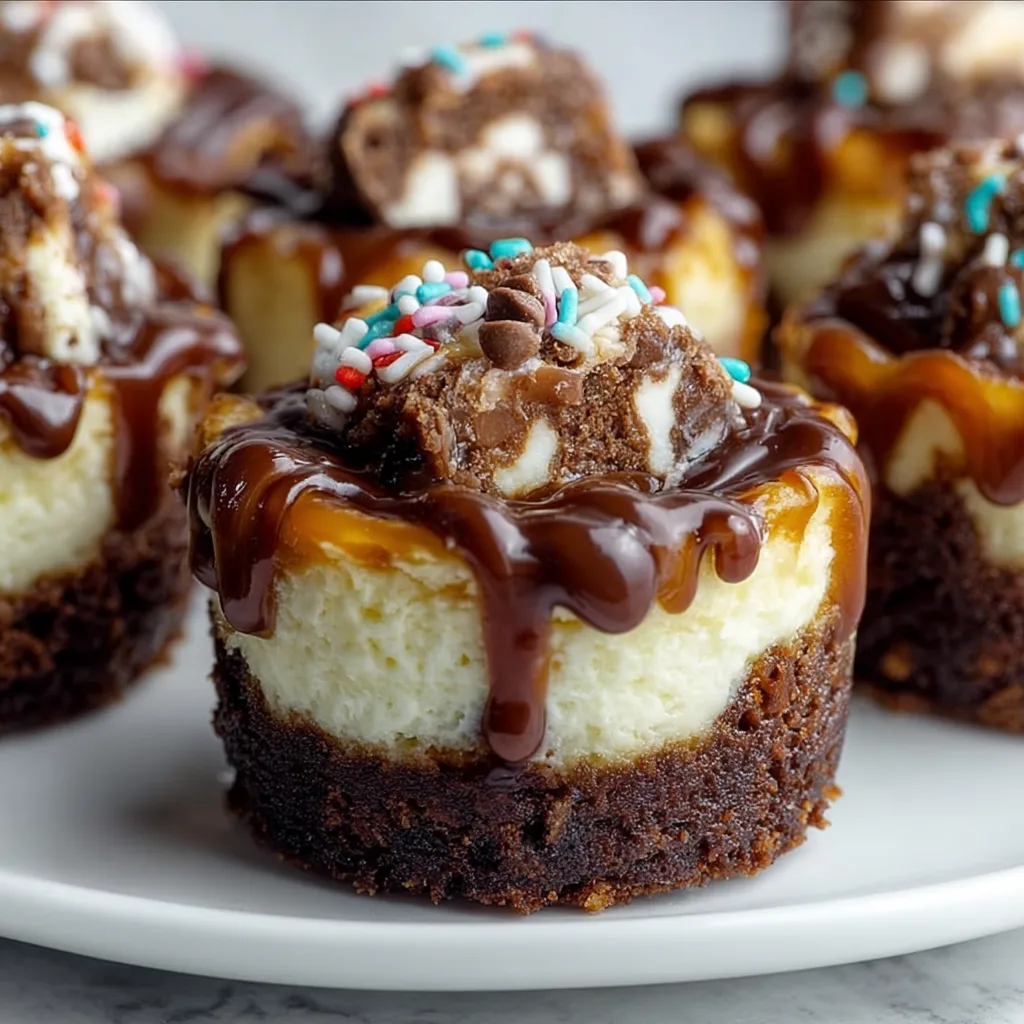
There’s dessert — and then there’s Loaded Brownie Cheesecake Cups. These bite-sized masterpieces combine two dessert worlds into one irresistible creation: rich, fudgy brownies and creamy, tangy cheesecake. Each cup is baked to perfection, then topped with chocolate ganache, mini chocolate chips, and crushed candies for a “loaded” finish that takes indulgence to the next level.
Whether you’re planning a party, looking for a make-ahead dessert, or simply craving something spectacular, these mini brownie cheesecakes will have everyone asking for seconds. They’re easy to make, perfectly portioned, and absolutely stunning on a dessert table.
Why You’ll Love Loaded Brownie Cheesecake Cups
- Two desserts in one: Get the best of brownies and cheesecake in a single bite.
- Individual portions: Perfect for parties, holidays, or anytime you want a mess-free treat.
- Customizable toppings: Load them with anything — crushed cookies, caramel drizzle, or candy bits.
- Rich yet balanced: The creamy cheesecake layer offsets the fudgy brownie for the perfect bite.
- Make-ahead friendly: These cups chill beautifully and taste even better the next day.
If you love layered desserts that feel luxurious but are simple to prepare, this recipe will be your new go-to for celebrations, potlucks, and cozy nights in.

Ingredients
Here’s everything you’ll need to create these heavenly little desserts:
For the Brownie Layer
- 1 box brownie mix (plus ingredients listed on box — usually eggs, oil, and water)
- ½ teaspoon espresso powder (optional, enhances chocolate flavor)
For the Cheesecake Layer
- 8 oz cream cheese, softened
- ¼ cup granulated sugar
- 1 large egg
- 1 teaspoon vanilla extract
For the Topping (Loaded Layer)
- ½ cup semi-sweet chocolate chips (for ganache)
- ¼ cup heavy cream
- ¼ cup mini chocolate chips
- ¼ cup crushed candy bars (Snickers, M&M’s, or Oreos work great)
- Optional: caramel drizzle or sea salt flakes

Instructions
- Preheat oven: Set your oven to 350°F (175°C). Line a 12-cup muffin pan with paper liners or grease lightly.
- Prepare brownie batter: Mix the brownie batter according to package directions, adding espresso powder if using. Spoon about 1 tablespoon of brownie batter into each muffin cup to form the base layer.
- Make cheesecake filling: In a medium bowl, beat cream cheese and sugar until smooth. Add egg and vanilla, mixing until creamy and lump-free.
- Add cheesecake layer: Spoon about 1 tablespoon of cheesecake filling over each brownie layer, spreading gently to cover.
- Top with more brownie batter (optional): If you want a swirl effect, add a small dollop of brownie batter on top of each cup and lightly swirl with a toothpick.
- Bake: Bake for 20–25 minutes or until the centers are set and a toothpick inserted near the edge comes out clean.
- Cool completely: Allow cups to cool in the pan for 10 minutes, then transfer to a wire rack. Chill in the refrigerator for at least 1 hour before adding toppings.
- Make ganache: Heat heavy cream in a small saucepan (or microwave) until steaming but not boiling. Pour over chocolate chips and let sit 2 minutes, then stir until smooth and glossy.
- Assemble: Spoon ganache over each cheesecake cup. Sprinkle with mini chocolate chips and crushed candies. Chill again until set.
Loaded Brownie Cheesecake Cups
Ingredients
Equipment
Method
- Preheat oven to 350°F (175°C) and line a 12-cup muffin pan with liners.
- Prepare brownie batter according to box instructions, adding espresso powder if desired.
- Spoon 1 tbsp brownie batter into each muffin cup for the base.
- In a bowl, beat cream cheese and sugar until smooth. Add egg and vanilla, mixing until creamy.
- Spoon cheesecake mixture over brownie base, spreading gently.
- Bake 20–25 minutes or until centers are set. Cool and chill at least 1 hour.
- Heat cream and pour over chocolate chips. Stir until smooth and glossy.
- Top each cup with ganache, mini chocolate chips, and crushed candies.
Notes
Storage
- Refrigerator: Store in an airtight container for up to 5 days.
- Freezer: Freeze for up to 3 months; thaw overnight in the fridge before serving.
- Room temperature: For best texture, allow chilled cups to sit for 10 minutes before eating.
Tips for Perfect Brownie Cheesecake Cups
- Room-temperature cream cheese: Ensures a smooth, creamy cheesecake layer.
- Don’t overbake: Slight jiggle in the center means creamy texture once chilled.
- Cool before topping: Hot cheesecake will melt ganache or toppings.
- Use real chocolate for ganache: Quality chocolate makes all the difference.
- Double the batch: These disappear quickly — you’ll wish you made more!
Flavor Variations
1. Salted Caramel Brownie Cheesecake Cups:
Top with caramel drizzle and a sprinkle of sea salt flakes for a salty-sweet twist.
2. Peanut Butter Cup Cheesecake Cups:
Swirl 1 tablespoon of melted peanut butter into the cheesecake layer and top with chopped Reese’s cups.
3. Oreo Explosion:
Add crushed Oreos to both the brownie batter and the topping for double cookies-and-cream flavor.
4. Mocha Madness:
Add 1 teaspoon instant coffee to the brownie layer and top with a dusting of cocoa powder.
5. Holiday Version:
Top with crushed peppermint candies or red-and-green M&Ms for a festive dessert.
Serving Ideas
- Dessert buffets: Arrange on tiered stands for a show-stopping centerpiece.
- Date night: Pair with a glass of red wine or espresso for the ultimate indulgence.
- Potlucks: Easy to transport, crowd-pleasing, and require no slicing.
- Gift boxes: Place in mini cupcake liners and gift in small boxes tied with ribbon.
Make-Ahead Option
You can prepare Loaded Brownie Cheesecake Cups up to two days in advance. Simply bake, cool, and refrigerate the cups without the toppings. Before serving, add ganache and candies for the freshest look and flavor.
They taste even better after chilling overnight — the flavors meld together beautifully, creating a dense, creamy bite of pure chocolate bliss.
Fun Fact: The Brownie-Cheesecake Combo
Brownie and cheesecake have been best friends in the dessert world for decades. The combination first appeared in American bakeries in the 1980s, when home bakers began swirling cheesecake batter into brownies for extra richness. These mini cups are a modern twist — turning that classic duo into a portable, party-friendly dessert that’s both elegant and indulgent.
Nutrition
Each Loaded Brownie Cheesecake Cup (with toppings) contains approximately:
- Calories: 280
- Carbs: 30g
- Protein: 4g
- Fat: 15g
- Sugar: 22g
Of course, this dessert is about joy, not macros — so indulge guilt-free and savor every decadent bite!
Final Thoughts
Loaded Brownie Cheesecake Cups are a true showstopper dessert that proves small treats can pack big flavor. With a fudgy brownie base, smooth cheesecake layer, and “loaded” toppings that make each bite unique, these cups are perfect for birthdays, holidays, or whenever you want to impress.
Easy to make, impossible to resist, and guaranteed to delight chocolate lovers everywhere — this is one dessert that will earn a permanent place in your recipe collection.